Sync inventory from an external inventory management system into Shopify
Sync inventory from an external inventory management system into Shopify
If you track stock in a separate inventory management system (a warehouse system, an ERP, a POS, or your own internal app), keeping Shopify in sync is usually the painful part. Most merchants do it by hand: export a stock report from their inventory system, open Shopify admin, and update each product one at a time, or wrestle with a generic CSV import app that overwrites fields they never meant to touch.
There is a faster, safer way. With Mixtable you can bring the inventory numbers from your external system into a spreadsheet that is connected live to your Shopify store, match each row to the right Shopify product (by SKU, barcode, or option values), update only the inventory cells, review everything, and then sync to Shopify when you are ready.
This guide walks through that workflow. It is built for the common situation where your inventory management system and Shopify share a single unique field, like a SKU or a barcode, that you can match on.
The big idea: match on a shared field
Your inventory management system and Shopify almost always have one field in common that uniquely identifies each item. That shared field is what lets Mixtable line up “this row in my stock export” with “this exact variant in Shopify” so the right quantity lands on the right product.
The most common shared fields are:
- SKU: the most popular choice, since most inventory systems and Shopify both store a SKU per variant
- Barcode: a great option when your inventory system keys everything off the product barcode (UPC, EAN, GTIN)
- Option values: if you match on variant options like size and color, you need to match on all of them exactly (for example Size and Color together), since a single option usually is not unique on its own
Because inventory in Shopify lives on the variant, your match field needs to identify a single variant, not just a product. SKU and barcode do this well. Matching on product handle or product title alone only works when each product has a single variant: if a product has several variants, pair the handle or title with a variant-identifying field (SKU, barcode, or option values) so each row points at one specific variant.
Pick whichever field your two systems truly have in common. As long as that value uniquely identifies a variant, Mixtable can use it to find the matching Shopify item.
What you will need
- A Mixtable Bulk Editor spreadsheet connected to your Shopify store
- An export from your inventory management system saved as a
.csvfile, with a header row, the shared field (SKU, barcode, etc.), and your current stock quantities
Step 1: Open an inventory worksheet for your store
Start with a worksheet that already shows your live Shopify inventory, so Mixtable has the existing products and locations to match against. There are two easy ways to get there.
Option A: start a new spreadsheet from the Inventory template. On your Mixtable home screen, create a new spreadsheet and pick the Inventory template. It comes preloaded with SKU, barcode, and per-location stock columns, so it is the fastest starting point if you do not already have a spreadsheet for this.
Option B: add a worksheet to an existing spreadsheet. In a spreadsheet you already use:
- Click the + button in the worksheet toolbar
- Under Products & Inventory, choose Products (with variants), which shows one row per variant
- Make sure the worksheet has the columns you need (SKU, barcode, and your per-location inventory fields). You can map any missing fields to columns from the column settings
- Wait for the worksheet to populate with your existing Shopify products and their current stock levels
Either way, if your store ships from more than one location you get one inventory column per location, so you can update the exact location you need. For more on this, see Manage Shopify inventory across multiple locations.
Step 2: Export inventory from your inventory management system
In your external inventory management system, run an export (or stock report) and save it as a CSV file. Make sure the file includes:
- The shared field you will match on (for example a
SKUorBarcodecolumn) - The current quantity for each item
- A header row, so the first row names each column
A simple file with just two columns, your shared field and the quantity, is enough to update stock. You do not need to export every field, only the ones you want to push into Shopify.
Step 3: Import the CSV into your worksheet
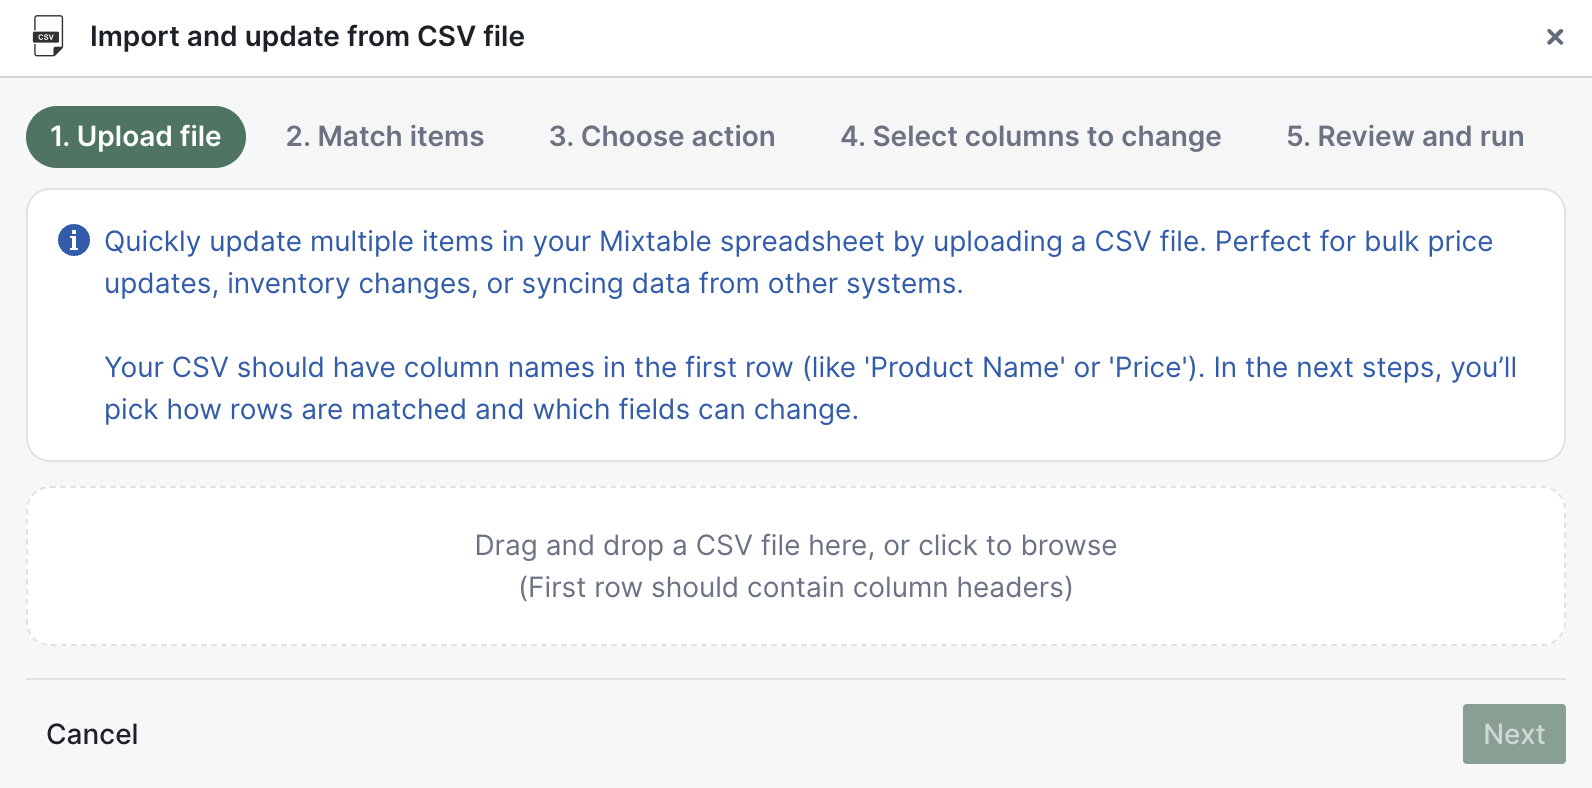
Now bring that export into Mixtable using the Import CSV file tool.
- In your spreadsheet toolbar, click Import & Export
- Click Import CSV file
- In step 1. Upload file, drag and drop your CSV (or click to browse) and wait for parsing to finish
This is the same importer used for any bulk update in Mixtable. For a complete walkthrough of every screen, see Import CSV to update or add Shopify store data.
Step 4: Match on your shared field
This is the most important step. Here you tell Mixtable how to find the same item in both your export and your Shopify worksheet.
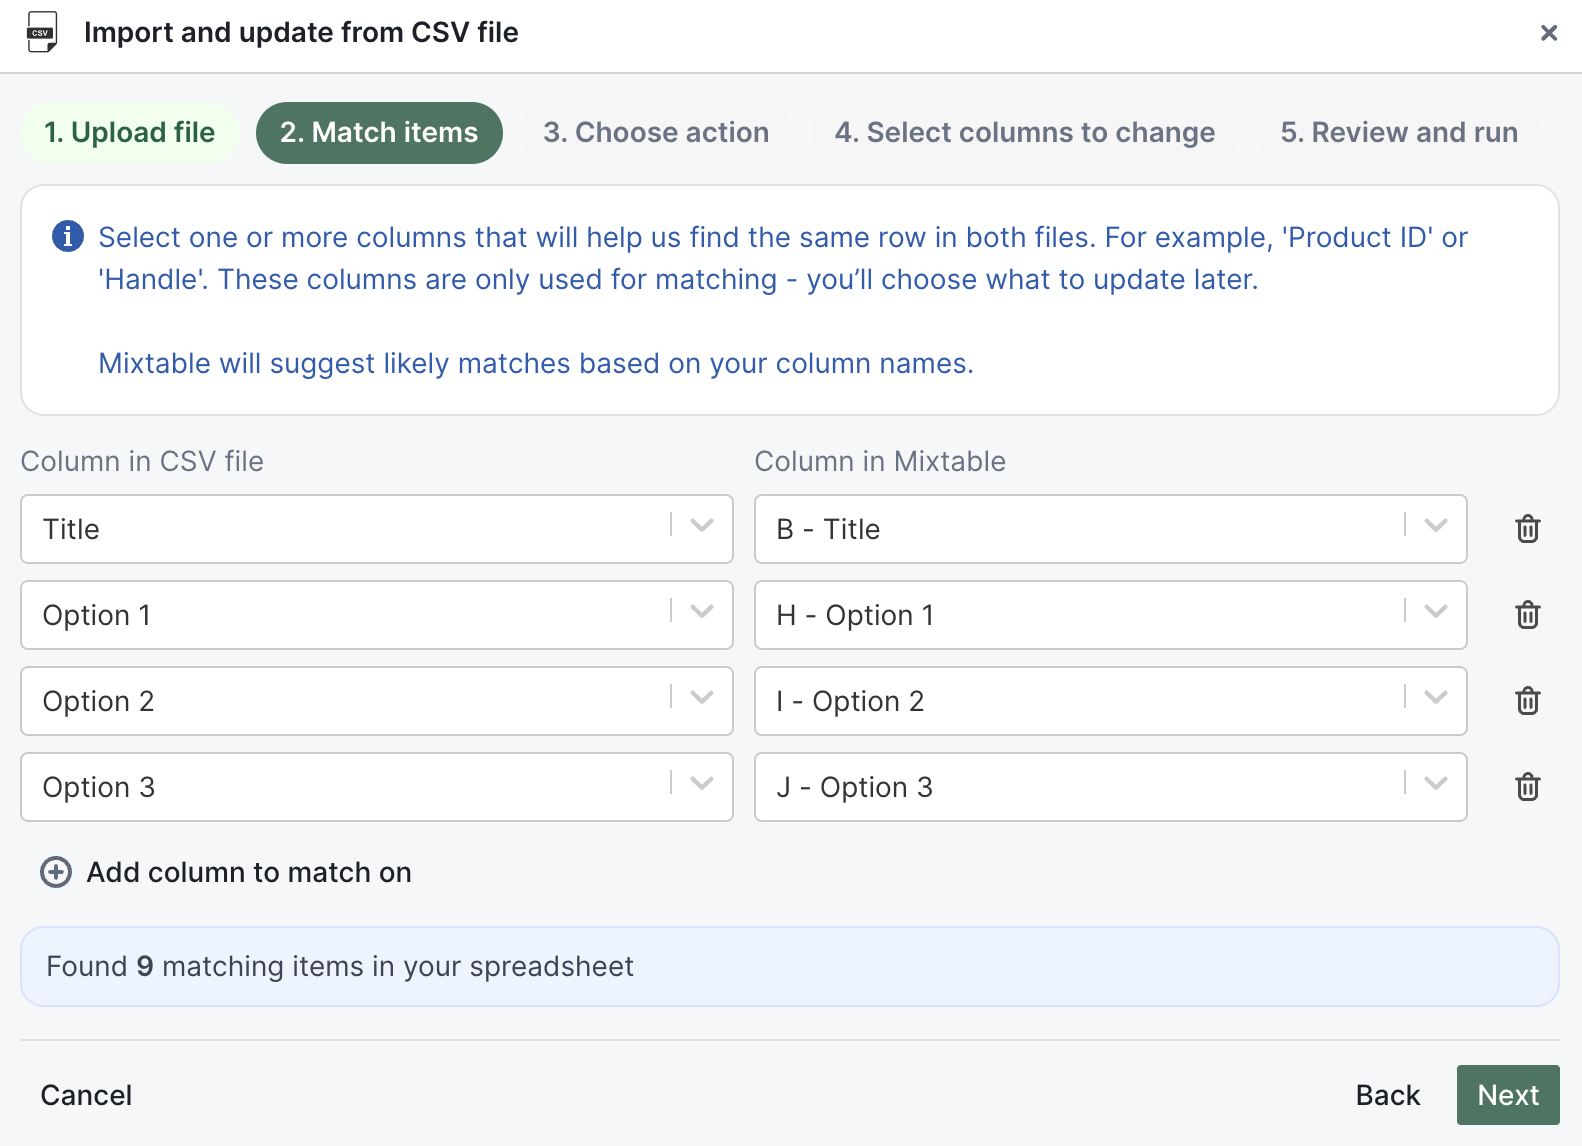
In step 2. Match items:
- In Column in CSV file, choose the shared field from your export (for example
SKUorBarcode) - In Column in Mixtable, choose the matching column in your worksheet (the SKU or barcode column)
- If one field is not enough to uniquely identify a row, click Add column to match on and add more
This is exactly how you match on multiple option values. If your shared identity is “Size plus Color,” add both: match CSV Size to Mixtable Option 1 and CSV Color to Mixtable Option 2, so all the options must line up before Mixtable treats two rows as the same variant.
Tip: Your match columns should uniquely identify a single row. If the same SKU or barcode appears more than once in your worksheet, Mixtable will ask you to add another match column before it continues, which protects you from updating the wrong item.
Step 5: Update matching rows only
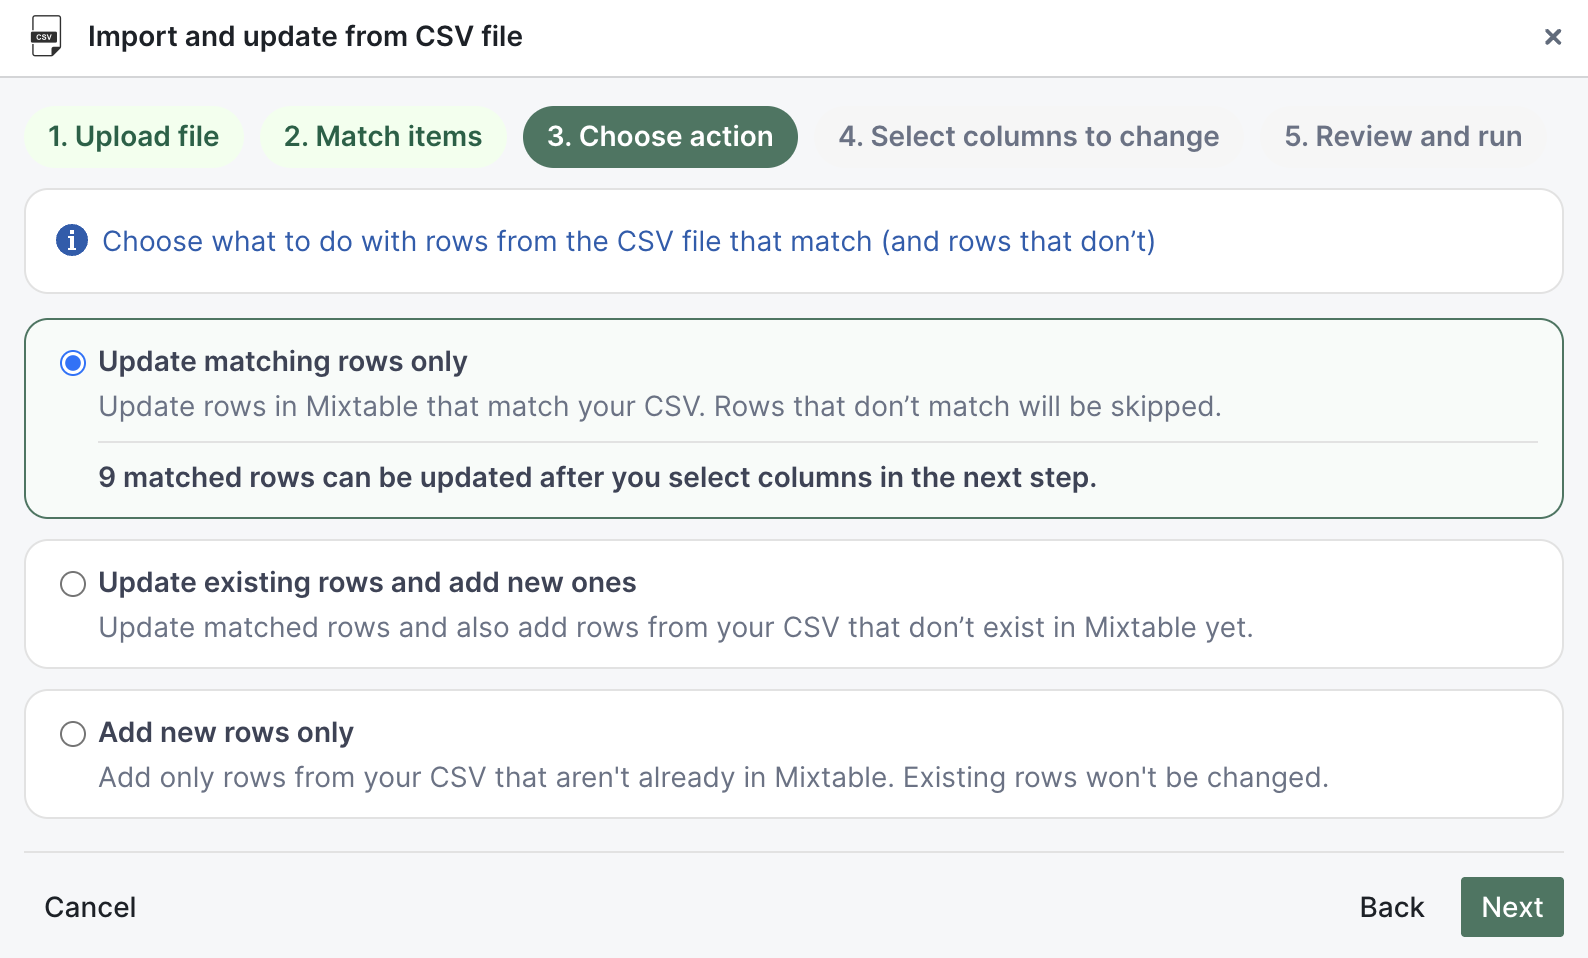
Since you are syncing stock for products that already exist in Shopify, you want to update what matches and leave everything else alone.
In step 3. Choose action, select Update matching rows only. Rows in your worksheet that match your CSV get updated, and any unmatched rows are skipped, so a stray line in your inventory export will never create a surprise product in your store.
Step 6: Update only the inventory cells
Now choose exactly which fields the import is allowed to change. This is what makes Mixtable safer than a generic CSV import: you map only the inventory columns, and every other field (titles, prices, descriptions, tags) stays untouched.
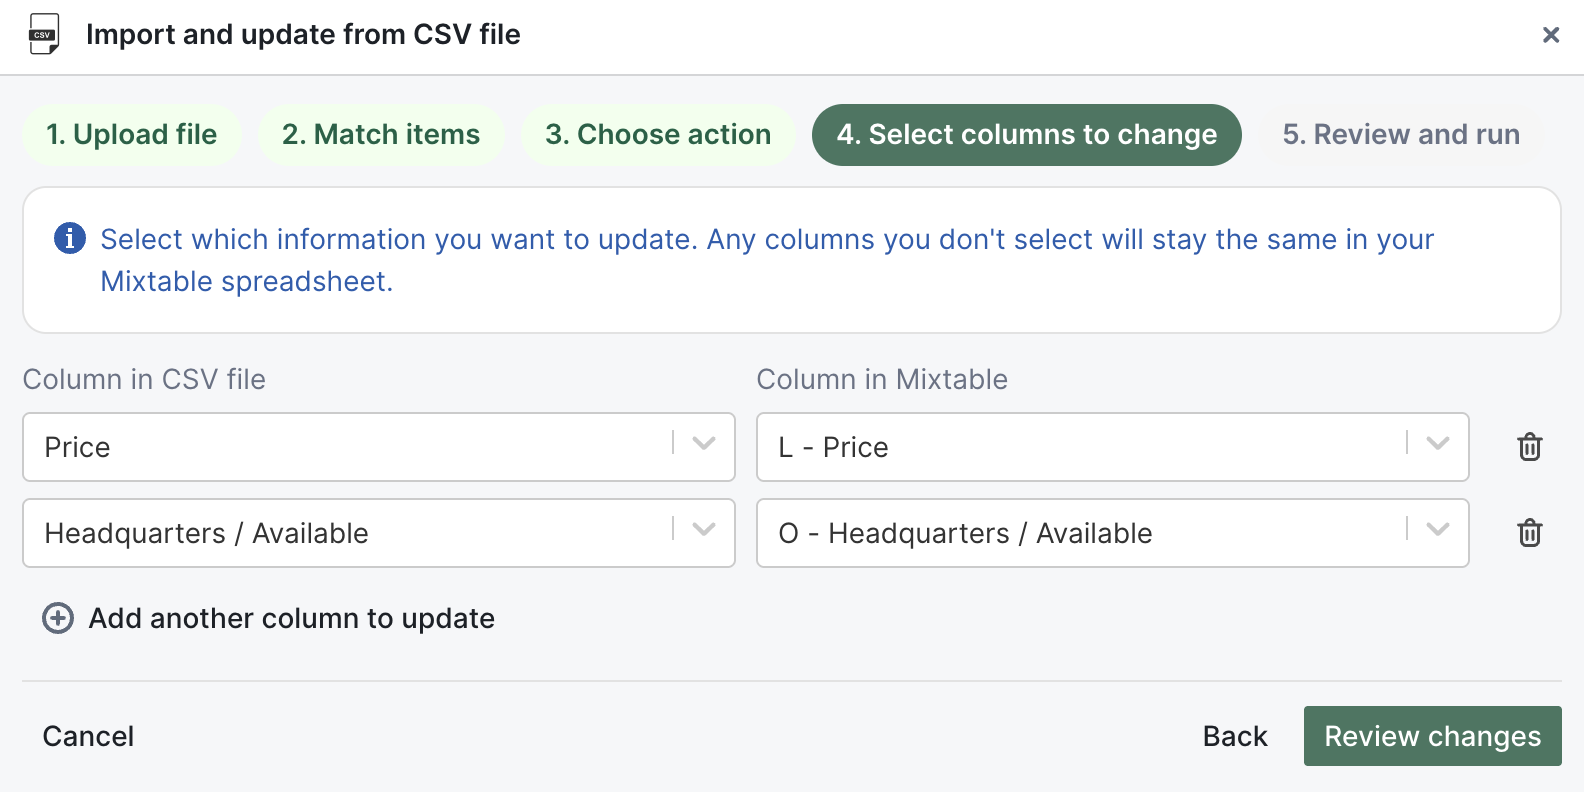
In step 4. Select columns to change:
- Map your export’s quantity column to the inventory column you want to update in Mixtable (your per-location inventory columns carry labels like New York / Available or Available inventory @ New York, depending on how the column was added)
- If you are updating several locations, click Add another column to update and map each location’s quantity to its column
- When you are done, click Review changes
Step 7: Review before you sync
Before anything reaches Shopify, Mixtable shows you a summary and a preview of the first affected rows so you can confirm the right numbers are going to the right products.
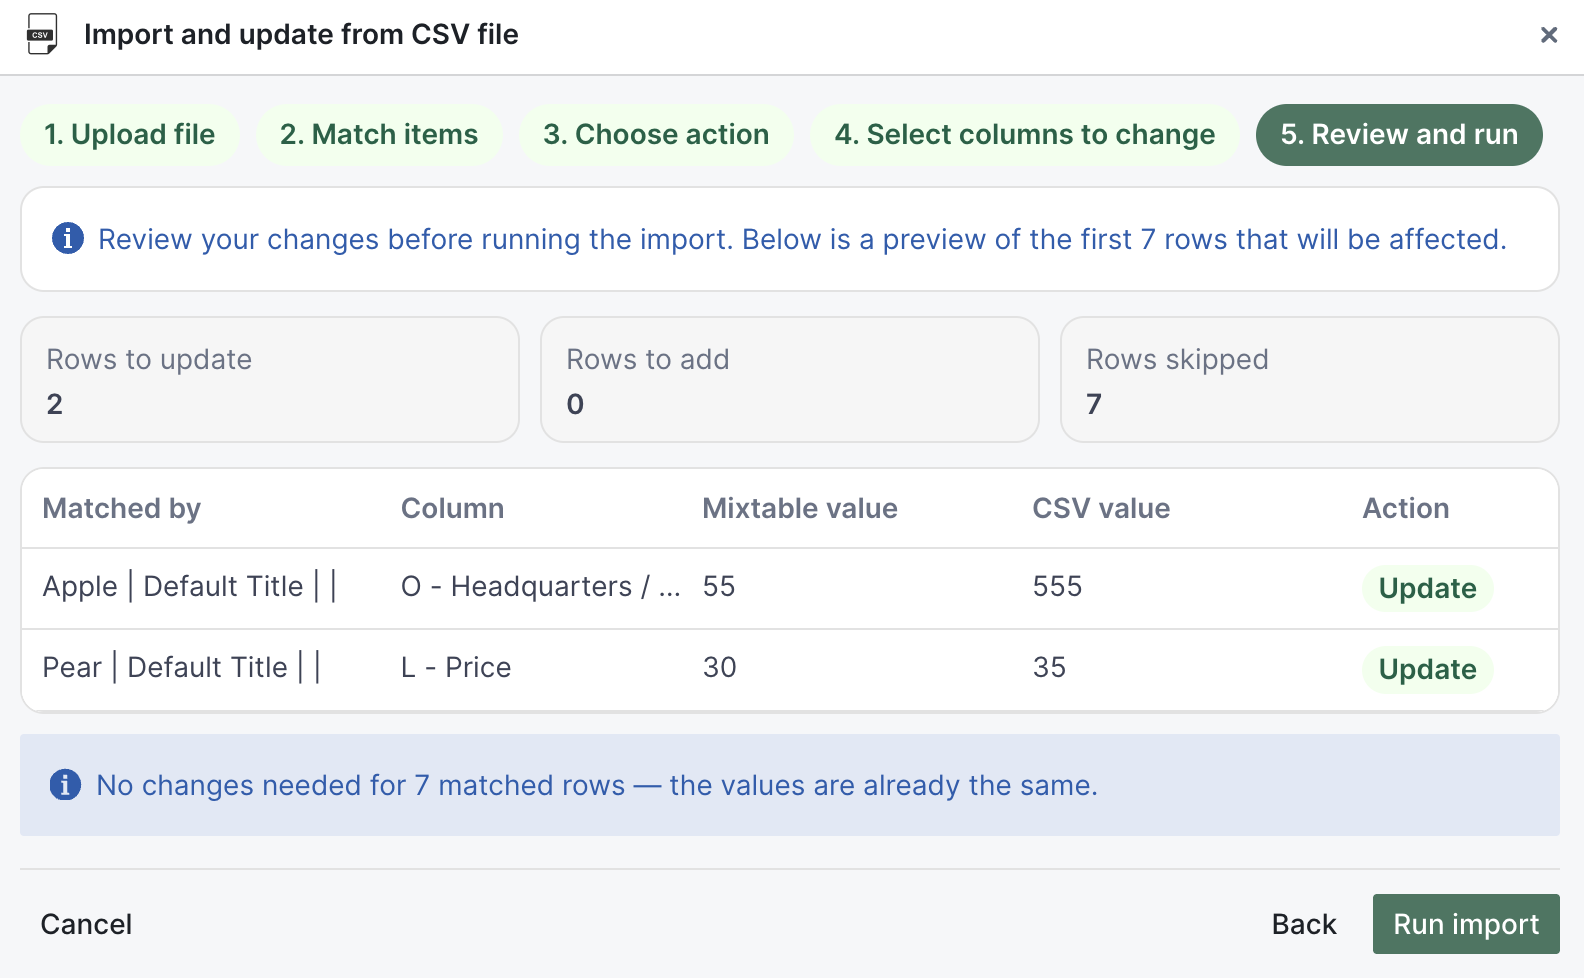
In step 5. Review and run:
- Check the summary for Rows to update, Rows to add, and Rows skipped
- Review the preview table and confirm the new inventory values look correct next to the current ones
- Click Run import
The import updates your Mixtable worksheet only. Nothing has changed in Shopify yet, which gives you a final chance to scan the worksheet and catch anything unexpected before it goes live.
Step 8: Sync to Shopify
When the worksheet looks right, you are ready to push your changes to your store.
- Click Preview changes to open a summary of every pending Shopify change in the worksheet
- Confirm the inventory updates look right (and that no unrelated edits are coming along that you did not intend)
- Click Sync to Shopify
The CSV import only changes the mapped worksheet cells. Keep in mind that Sync to Shopify sends all pending Shopify-connected changes in the worksheet, so if you had other draft edits sitting in the sheet before the import, those will sync too. That is exactly what Preview changes is for: it shows you everything that will be sent before anything reaches your store.
That is the whole loop: export from your inventory management system, import and match in Mixtable, update just the inventory cells, preview, and sync. Next time you need to refresh stock, you repeat the same steps with a fresh export.
A simpler option for a handful of items: copy and paste
If you only have one or two items (or a couple of locations) to update, you may not need the CSV importer at all. You can copy your quantities straight out of your inventory system (or out of Excel) and paste them into the matching cells in your Mixtable worksheet, then preview and click Sync to Shopify.
For anything beyond a few items, the CSV importer is the better choice, and it is the whole point of this workflow: matching on SKU or barcode guarantees each number lands on the correct product even when your rows are in a different order than Shopify, so you avoid the slow, error-prone manual updating you would otherwise be doing for every product.
Frequently asked questions
Can I match on barcode instead of SKU? Yes. In the Match items step, choose your barcode column in both your CSV and your Mixtable worksheet. Any field your two systems share can be the match key, as long as it is unique.
What if my products are matched by several option values? Add a match column for each option (for example Size and Color) using Add column to match on. Mixtable will only treat rows as the same variant when all the option values match exactly.
Will the import change my prices or product details? No. Only the columns you map in Select columns to change are updated. If you map just your inventory columns, prices, titles, descriptions, and everything else stay exactly as they are.
Does the import push to Shopify automatically? No. The import updates your Mixtable worksheet, and your changes go live only when you click Sync to Shopify. You can hit Preview changes first to confirm exactly what will be sent
You're ready!
Mixtable is an online spreadsheet designed to sync data with Shopify. It looks, feels, and behaves like Excel (including formulas), but runs in your browser. With Mixtable you can:
- Bulk add products to collections, edit metafields, add or remove tags;
- Change product prices, including international prices, and review price history;
- Manage customers with a spreadsheet CRM for Shopify;
- Use Excel features like sort ascending or descending, find-replace, filter, and more.
Best of all, you can sync changes back to Shopify with a single click. Find out more about the Mixtable suite of products here.
Manage Shopify data in a spreadsheet.
Use Mixtable to edit, sync, analyze, import, and export your Shopify store data without CSV juggling.