Mixtable is an online spreadsheet, designed from the ground up to bulk edit and analyze Shopify data.
Got a question? We're here to help! Reach out at [email protected], and we'll get back
to you promptly.
Mixtable’s Excel-like spreadsheet interface was designed from the ground up to be the best way out there to bulk edit the data in your Shopify store. You can edit almost everything, and you can customize your workbook to suit your needs.
In Mixtable, you work within a workbook. Mixtable workbooks look, feel, and behave almost exactly as Excel does. They just run in your browser. To begin bulk editing your Shopify data, you first have to create a workbook and link that workbook with your Shopify store’s data. You have two paths to start when creating a workbook.
Note: Not all data is automatically populated into these template worksheets, just the most commonly used ones. You are free to add more data as needed.
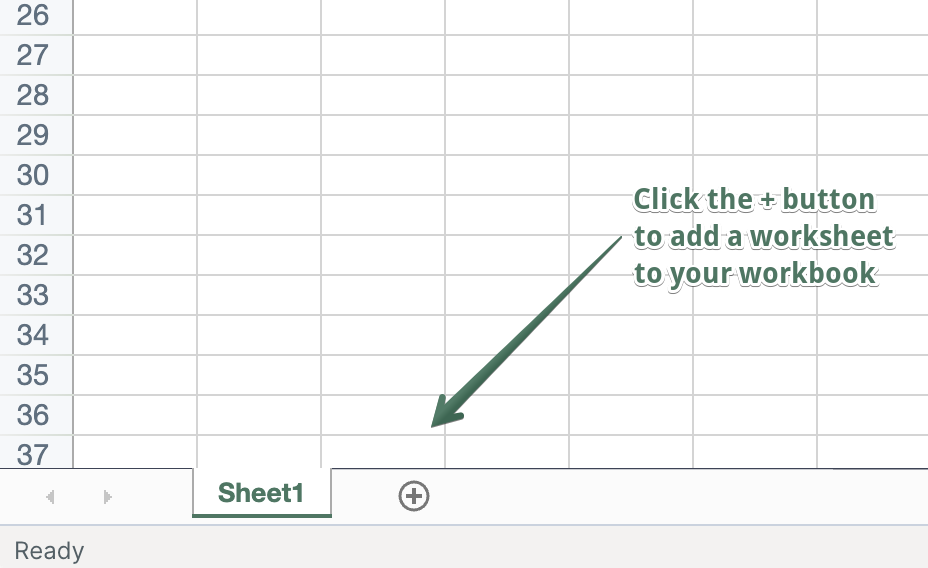
Add а new worksheet:
In an existing Mixtable workbook, click the (+) button to add a new worksheet.
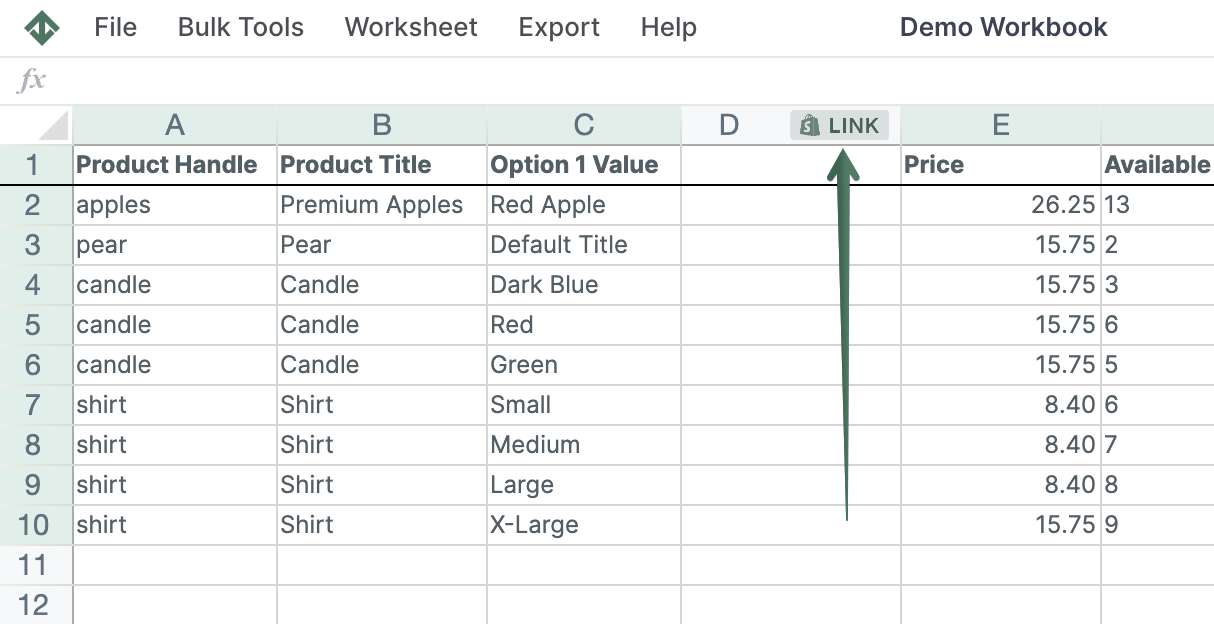
Columns in Mixtable can either be standard ones, i.e., work just like in Excel, or they can be linked to a particular data field in Shopify.
To load new Shopify data, start by selecting an empty column — any column with a non-green header (green headers mean the column is already linked to Shopify data). Then, click the ⚡️ button in the column header to open the selection window to choose the data you want to pull in.
You will now be presented with a set of options for the data you want to sync. These options will change depending on what data (e.g., products) you have set to sync to the particular worksheet. The column sync settings options are:
When a column is added to a worksheet, whether that is during worksheet creation or by you afterward, the column immediately begins populating with data. This might take a bit of time, depending on how much data you have. For example, if you are trying to populate the product title for 100,000 products, that will take considerably longer than if you have 1,000 products. So please be patient while your data loads. You will see a visual indicator at the top of the screen in the formula bar saying that the worksheet is read-only as it is being populated with data. Once the data population is done, you can begin to bulk edit your content.
This part is fairly straightforward: Find the cell that contains the existing data you want to update, modify its value, and then initiate a sync of your data to Shopify. You initiate the sync by pressing the Sync sheet to Shopify button in the upper right corner of your screen.
Please note that data is synchronized to Shopify on a per-worksheet basis. So when you click the Sync sheet to Shopify button, Mixtable will begin to sync the changed cells in the currently opened worksheet. Any changes in other worksheets that are currently inactive will not be touched. This allows you to modify multiple worksheets and trigger their sync to Shopify one at a time as you see fit.
You're ready!
Mixtable is an online spreadsheet designed to sync data with Shopify. It looks, feels, and behaves like Excel (including formulas), but runs in your browser. With Mixtable you can:
Best of all, you can sync changes back to Shopify with a single click. Find out more about the Mixtable suite of products here.